以前にもアイキャッチ画像に関することは記載済みですが、アイキャッチ画像は作成したり著作権だったり肖像権だったりといろいろと面倒ですよね。最近では大手サイトでもアイキャッチ画像は芸能人などのスキャンダル記事や著名人の何かしらの記事の場合でも、写真的な画像にてアイキャッチ画像を設定するサイトも少なくなってきています。そこで、記事のタイトルをアイキャッチ画像の中央に表示し背景は単色のものだったりグラデーション追加した背景画像のものだったりします。その背景に記事タイトルを文字としてアイキャッチ画像に設定したりします。
それをわざわざフォトショップ(Photoshop)や画像作成アプリなどを使用せずに、自動的にアイキャッチ画像を生成しタイトルを文字として表示されるアイキャッチ画像自動生成のコードになります。
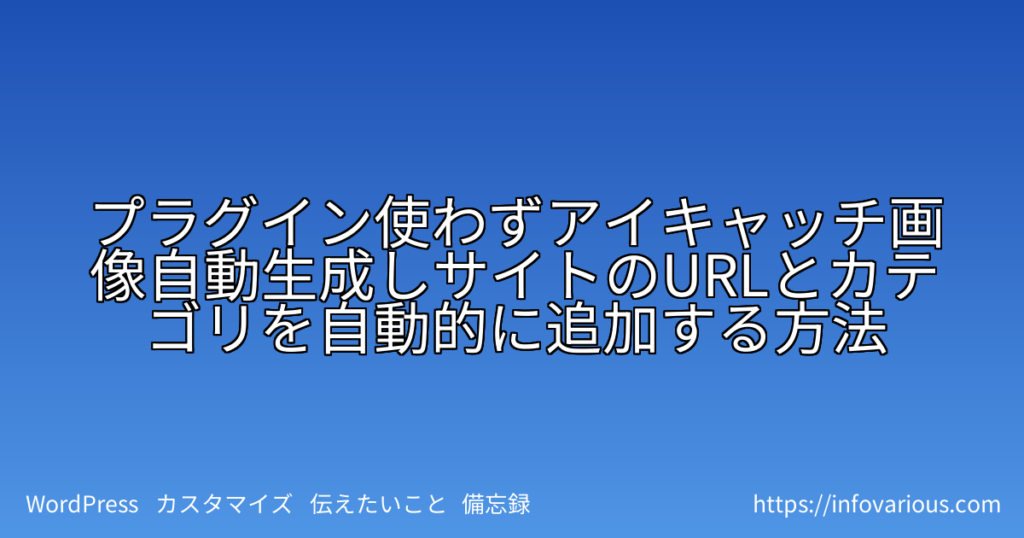
以前の記事にて紹介したものはサーバーやテーマなどによってうまく表示されない場合もあったかもしれません。今回は、しっかりとタイトルが背景の画像の中央に表示され、文字数の多いタイトルの場合には適宜改行して中央に表示されるようにしたものです。
その他に、右下にサイトURLを表示し左下にカテゴリを表示するようにしたものです。
カテゴリが複数ある場合には、複数のカテゴリが左下に表示されるようになっています。
/**
 * Automatically generates a featured image with centered title,
 * outlined site URL at the bottom right, and category at the bottom left.
 * Compatible with PHP 8.2.
 */
function generate_custom_featured_image($post_id) {
    remove_action('save_post', 'generate_custom_featured_image');

$post = get_post($post_id);
    if (!$post || wp_is_post_revision($post_id)) return;


$width = 1200;
    $height = 630;
    $image = imagecreatetruecolor($width, $height);


// 背景透過対応
    imagesavealpha($image, true);
    $transparent = imagecolorallocatealpha($image, 0, 0, 0, 127);
    imagefill($image, 0, 0, $transparent);


// グラデーション背景(青系)
    for ($y = 0; $y < $height; $y++) {
        $r = 30 + (int)(($y / $height) * 50);
        $g = 80 + (int)(($y / $height) * 70);
        $b = 180 + (int)(($y / $height) * 50);
        $color = imagecolorallocate($image, $r, $g, $b);
        imageline($image, 0, $y, $width, $y, $color);
    }


// 色設定
    $text_color = imagecolorallocate($image, 255, 255, 255);
    $outline_color = imagecolorallocate($image, 0, 0, 0);
    $shadow_color = imagecolorallocate($image, 50, 50, 50);


// フォントパス
    $font_path = get_template_directory() . '/fonts/NotoSansJP-Regular.ttf';
    if (!file_exists($font_path)) {
        $font_path = get_stylesheet_directory() . '/fonts/NotoSansJP-Regular.ttf';
        if (!file_exists($font_path)) return;
    }


// タイトル処理(改行含む)
    $title = get_the_title($post_id);
    $font_size = 50;
    $max_text_width = $width - 200;
    $lines = [];
    $line = '';


for ($i = 0; $i < mb_strlen($title); $i++) {
        $char = mb_substr($title, $i, 1);
        $test_line = $line . $char;
        $bbox = imagettfbbox($font_size, 0, $font_path, $test_line);
        $test_width = abs($bbox[2] - $bbox[0]);
        if ($test_width > $max_text_width && $line !== '') {
            $lines[] = $line;
            $line = $char;
        } else {
            $line = $test_line;
        }
    }
    if ($line !== '') $lines[] = $line;


$line_height = $font_size + 12;
    $total_text_height = count($lines) * $line_height;
    $start_y = ($height - $total_text_height) / 2;


foreach ($lines as $i => $text_line) {
        $bbox = imagettfbbox($font_size, 0, $font_path, $text_line);
        $text_width = abs($bbox[2] - $bbox[0]);
        $text_height = abs($bbox[5] - $bbox[1]);
        $x = ($width - $text_width) / 2;
        $y = $start_y + $i * $line_height + $text_height;


// 影
        imagettftext($image, $font_size, 0, $x + 2, $y + 2, $shadow_color, $font_path, $text_line);


// 縁取り
        for ($ox = -2; $ox <= 2; $ox++) {
            for ($oy = -2; $oy <= 2; $oy++) {
                if ($ox !== 0 || $oy !== 0) {
                    imagettftext($image, $font_size, 0, $x + $ox, $y + $oy, $outline_color, $font_path, $text_line);
                }
            }
        }


// メインテキスト
        imagettftext($image, $font_size, 0, $x, $y, $text_color, $font_path, $text_line);
    }


// カテゴリ(左下)
    $categories = get_the_category($post_id);
    if (!empty($categories)) {
        $cat_font_size = 20;
        $x_cat = 30;
        $y_cat = $height - 30;
        foreach ($categories as $cat) {
            $cat_name = $cat->name;
            imagettftext($image, $cat_font_size, 0, $x_cat, $y_cat, $text_color, $font_path, $cat_name);
            $x_cat += imagettfbbox($cat_font_size, 0, $font_path, $cat_name)[2] + 20;
        }
    }


// サイトURL(右下)
    $site_url = get_site_url();
    $url_font_size = 20;
    $bbox_url = imagettfbbox($url_font_size, 0, $font_path, $site_url);
    $url_width = abs($bbox_url[2] - $bbox_url[0]);
    $url_x = $width - $url_width - 30;
    $url_y = $height - 30;
    imagettftext($image, $url_font_size, 0, $url_x, $url_y, $text_color, $font_path, $site_url);


// 保存(PNG)
    $upload_dir = wp_upload_dir();
    $image_path = $upload_dir['path'] . '/featured-' . $post_id . '.png';
    imagepng($image, $image_path, 9);
    imagedestroy($image);


if (!file_exists($image_path)) {
        add_action('save_post', 'generate_custom_featured_image');
        return;
    }


// 添付として登録
    $attachment = [
        'post_mime_type' => 'image/png',
        'post_title'     => sanitize_file_name('Featured Image ' . $post->post_title),
        'post_content'   => '',
        'post_status'    => 'inherit'
    ];
    $attach_id = wp_insert_attachment($attachment, $image_path, $post_id);
    require_once(ABSPATH . 'wp-admin/includes/image.php');
    $attach_data = wp_generate_attachment_metadata($attach_id, $image_path);
    wp_update_attachment_metadata($attach_id, $attach_data);
    set_post_thumbnail($post_id, $attach_id);

add_action('save_post', 'generate_custom_featured_image');
}
add_action('save_post', 'generate_custom_featured_image');
このコードの場合にはNotoSansJP-Regular.ttfを指定していますのでNotoSansJP-Regular.ttfを、サーバー内のThemeフォルダ内に新たにfontsフォルダを作成しNotoSansJP-Regular.ttfをアップロード済みです。
以下の部分です参照してください。
$font_path = get_template_directory() . '/fonts/NotoSansJP-Regular.ttf';←//この部分$font_path = get_stylesheet_directory() . '/fonts/NotoSansJP-Regular.ttf';//←この部分上記コードの以下の部分でフォントを指定していますので、各々のテーマ内にfontsフォルダを作成し該当のフォントをアップロードしておく必要があります。
NotoSansJP-Regular.ttf以外にも日本語対応のフォントであれば文字化けしないので、arial.ttfなどでも良いかもしれません。
ただし、日本語対応のフォントでない場合には文字化け消してしまうので日本語対応のフォントを選択してThemeフォルダ内に新たにfontsフォルダを作成しアップロードしておいてください。
コードに記載されているフォントがない場合にはエラーになりますので注意してください。
NotoSansJP-Regular.ttfは以下のGoogle Fontsサイトにてダウンロードができます。
Google Fontsサイトトップページは以下になりますので、その他のフォントを指定する場合には検索してダウンロードし指定したフォントをThemeフォルダ内に新たにfontsフォルダを作成しアップロードしておいてください。
その他アイキャッチ画像自動生成コードは以下にも紹介していますので、参考になりましたら幸いです。

いろいろな方法がありますが、できるだけプラグインを使いたくない方はご自身にてfunction.php内にコードにて関数を作成して、動作するものがあればその方が良いのかなと思われます。
今回のアイキャッチ画像自動生成コードにて作成されたアイキャッチ画像は以下のよなものになります。
背景色などは各々にて好みの色に変更カスタマイズしてみていください。

あなたにおすすめ


関連記事
-

-
ナビテレビが見れなくなった時ICカードが正常に動作しませんでした対処方法
本日ではなく昨日になってしまいますが、それまでカーナビで地デジ対応のナビで突然エンジンをかけなおしたら・・・・・・。 「ICカードが正常に動作しませんでした。販売店にお問い合わせください。」 なんてい…

-
-
日産ディーラーオプションナビMM316D-WからMM518D-L交換(換装)NISSAN純正ナビリモコン
ある程度、年式がたった車においてはディーラーオプションナビ(DOP)やメーカーオプションナビ(MOP)の地図データが古くなったり、ナビのモニタインチ数が大きくなったりします。地図データが古くなるのはも…

-
-
車のキーナンバー確認方法。キーレス紛失や壊れた時
初めての経験でした。(汗)…。 キーレスエントリー、キーレスリモコンがついた鍵がエンジンを回す時にボキッと折れてしまいました。(汗)…。 プラスチックの本体部分と鉄のキー部分が分裂してしまいました。 …

 ポチップ
ポチップ  ポチップ
ポチップ 


新着コメント