多くのサイトやブログなどの記事に、その記事に対して目を引く画像という意味合いのアイキャッチ画像。そのアイキャッチ画像を毎回毎回設定したり、作成したりするのは少し面倒な方は多いと思われます。大手サイトの記事などにも人の目を引くアイキャッチ画像があることが多いですね。そんな中で、もういろいろと作成したり設定するのは大変だし面倒だという方は、以下のコードをfunction.phpに追記するのみでWordPressのプラグインなど使用せずに、タイトルが自動的に背景色の中央部分に適宜改行して表示されるようになります。
※ただし、function.phpはとっても大切なファイルになりますので、必ずバックアップしてから試してください。
以下のコードをfunction.phpに追記するのみで、自動的にアイキャッチ画像を生成(作成)して、かつ設定してくれるようになります。
/**
 * Automatically generates a featured image with centered title,
 * outlined site URL at the bottom right, and category at the bottom left.
 * Compatible with PHP 8.2.
 */
function generate_custom_featured_image($post_id) {
    remove_action('save_post', 'generate_custom_featured_image');

$post = get_post($post_id);
    if (!$post || wp_is_post_revision($post_id)) return;


// すでにアイキャッチ画像が設定されている場合は処理をスキップ
    if (has_post_thumbnail($post_id)) {
        return;
    }


$width = 1200;
    $height = 630;
    $image = imagecreatetruecolor($width, $height);


// 背景透過対応
    imagesavealpha($image, true);
    $transparent = imagecolorallocatealpha($image, 0, 0, 0, 127);
    imagefill($image, 0, 0, $transparent);


// グラデーション背景(青系)
    for ($y = 0; $y < $height; $y++) {
        $r = 30 + (int)(($y / $height) * 50);
        $g = 80 + (int)(($y / $height) * 70);
        $b = 180 + (int)(($y / $height) * 50);
        $color = imagecolorallocate($image, $r, $g, $b);
        imageline($image, 0, $y, $width, $y, $color);
    }


// 色設定
    $text_color = imagecolorallocate($image, 255, 255, 255);
    $outline_color = imagecolorallocate($image, 0, 0, 0);
    $shadow_color = imagecolorallocate($image, 50, 50, 50);


// フォントパス
    $font_path = get_template_directory() . '/fonts/NotoSansJP-Regular.ttf';
    if (!file_exists($font_path)) {
        $font_path = get_stylesheet_directory() . '/fonts/NotoSansJP-Regular.ttf';
        if (!file_exists($font_path)) return;
    }


// タイトル処理(改行含む)
    $title = get_the_title($post_id);
    $font_size = 50;
    $max_text_width = $width - 200;
    $lines = [];
    $line = '';


for ($i = 0; $i < mb_strlen($title); $i++) {
        $char = mb_substr($title, $i, 1);
        $test_line = $line . $char;
        $bbox = imagettfbbox($font_size, 0, $font_path, $test_line);
        $test_width = abs($bbox[2] - $bbox[0]);
        if ($test_width > $max_text_width && $line !== '') {
            $lines[] = $line;
            $line = $char;
        } else {
            $line = $test_line;
        }
    }
    if ($line !== '') $lines[] = $line;


$line_height = $font_size + 12;
    $total_text_height = count($lines) * $line_height;
    $start_y = ($height - $total_text_height) / 2;


foreach ($lines as $i => $text_line) {
        $bbox = imagettfbbox($font_size, 0, $font_path, $text_line);
        $text_width = abs($bbox[2] - $bbox[0]);
        $text_height = abs($bbox[5] - $bbox[1]);
        $x = ($width - $text_width) / 2;
        $y = $start_y + $i * $line_height + $text_height;


// 影
        imagettftext($image, $font_size, 0, $x + 2, $y + 2, $shadow_color, $font_path, $text_line);


// 縁取り
        for ($ox = -2; $ox <= 2; $ox++) {
            for ($oy = -2; $oy <= 2; $oy++) {
                if ($ox !== 0 || $oy !== 0) {
                    imagettftext($image, $font_size, 0, $x + $ox, $y + $oy, $outline_color, $font_path, $text_line);
                }
            }
        }


// メインテキスト
        imagettftext($image, $font_size, 0, $x, $y, $text_color, $font_path, $text_line);
    }


// カテゴリ(左下)
    $categories = get_the_category($post_id);
    if (!empty($categories)) {
        $cat_font_size = 20;
        $x_cat = 30;
        $y_cat = $height - 30;
        foreach ($categories as $cat) {
            $cat_name = $cat->name;
            imagettftext($image, $cat_font_size, 0, $x_cat, $y_cat, $text_color, $font_path, $cat_name);
            $x_cat += imagettfbbox($cat_font_size, 0, $font_path, $cat_name)[2] + 20;
        }
    }


// サイトURL(右下)
    $site_url = get_site_url();
    $url_font_size = 20;
    $bbox_url = imagettfbbox($url_font_size, 0, $font_path, $site_url);
    $url_width = abs($bbox_url[2] - $bbox_url[0]);
    $url_x = $width - $url_width - 30;
    $url_y = $height - 30;
    imagettftext($image, $url_font_size, 0, $url_x, $url_y, $text_color, $font_path, $site_url);


// 保存(PNG)
    $upload_dir = wp_upload_dir();
    $image_path = $upload_dir['path'] . '/featured-' . $post_id . '.png';
    imagepng($image, $image_path, 9);
    imagedestroy($image);


if (!file_exists($image_path)) {
        add_action('save_post', 'generate_custom_featured_image');
        return;
    }


// 添付として登録
    $attachment = [
        'post_mime_type' => 'image/png',
        'post_title'     => sanitize_file_name('Featured Image ' . $post->post_title),
        'post_content'   => '',
        'post_status'    => 'inherit'
    ];
    $attach_id = wp_insert_attachment($attachment, $image_path, $post_id);
    require_once(ABSPATH . 'wp-admin/includes/image.php');
    $attach_data = wp_generate_attachment_metadata($attach_id, $image_path);
    wp_update_attachment_metadata($attach_id, $attach_data);
    set_post_thumbnail($post_id, $attach_id);

add_action('save_post', 'generate_custom_featured_image');
}
add_action('save_post', 'generate_custom_featured_image');
この関数は投稿が保存される際に自動的にアイキャッチ画像を生成し、設定します。
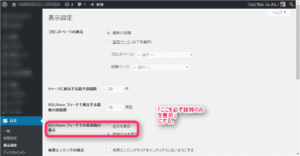
上記コードをfunction.phpに追記するのみで、新規投稿画面が表示される際には、既に指定した背景色で右下にはご自分のサイトURLが表示されます。また、カテゴリも設定した後に左下に表示されるようになっています。複数のカテゴリにも対応しています。
サイトURLや、カテゴリはいらない不要だという方は、該当箇所を削除なりコメントアウトなりしてカスタマイズなどするとよいのかと思われます。
タイトルが自動的に適宜改行して中央に表示されるようになっています。また、タイトルのFontはご自身のお好みに合わせて変更してみてください。このコードの場合はNotoSansJP-Regular.ttfになっていますので、arial.ttfなど日本語対応のフォントに指定し直して該当フォントをご自身の使用しているサーバー内のThemeファイル内にアップロードしてください。ない場合にはエラーになります。
NotoSansJP-Regular.ttfは以下のGoogleフォントにてダウンロードが可能となっています。
arial.ttfは以下のGitHubサイトからダウンロードが可能になっていますが、5年前と少し古いですね。

もしくは以下のサイトからもダウンロードが可能になっています。
こちらのサイトのarial.ttfは2019年11月26日のもののようです。上記のGitHubサイトも5年前なので同じものなのかもしれません。
前回のアイキャッチ画像自動生成のコードにおいても、アイキャッチ画像自動生成し上記内容のようにタイトルを中央に表示しますが、ご自身でアイキャッチ画像を設定した場合でも強制的に自動生成したアイキャッチ画像が設定されてしまうので少しコードが変わっています。
自分でアイキャッチ画像を設定した場合には、アイキャッチ画像自動生成したアイキャッチ画像ではなくご自身で設定したアイキャッチ画像が反映されるようになっています。

今回アイキャッチ画像自動生成にて作成されたアイキャッチ画像は以下になります。


あなたにおすすめ


関連記事
-

-
ナビテレビが見れなくなった時ICカードが正常に動作しませんでした対処方法
本日ではなく昨日になってしまいますが、それまでカーナビで地デジ対応のナビで突然エンジンをかけなおしたら・・・・・・。 「ICカードが正常に動作しませんでした。販売店にお問い合わせください。」 なんてい…

-
-
日産ディーラーオプションナビMM316D-WからMM518D-L交換(換装)NISSAN純正ナビリモコン
ある程度、年式がたった車においてはディーラーオプションナビ(DOP)やメーカーオプションナビ(MOP)の地図データが古くなったり、ナビのモニタインチ数が大きくなったりします。地図データが古くなるのはも…
-
-
車のキーナンバー確認方法。キーレス紛失や壊れた時
初めての経験でした。(汗)…。 キーレスエントリー、キーレスリモコンがついた鍵がエンジンを回す時にボキッと折れてしまいました。(汗)…。 プラスチックの本体部分と鉄のキー部分が分裂してしまいました。 …

 ポチップ
ポチップ  ポチップ
ポチップ 


新着コメント